This post is to highlight some of my face-up techniques. I'm by no means the best, and there are lots of face-up tutorials out there, but hopefully you will get some use out of this tutorial. :) I will try to update this post as I come across more face up questions. First, the FAQ, then the materials list, followed by the tutorial.
Note: I don't update this as I improve my faceups because that's a pain in the butt, so if you want to see my latest stuff you can always check my flickr.
https://www.flickr.com/photos/amaranthscastaways/
Face Up FAQ
Q:What materials do I need?
A:See below!
Q:Do I need a face up on my doll?
A:Nope, but some people find the blank dolls disconcerting or just boring. It's just personal preference.
Q:Do I need to seal the doll before I paint?
A:Yes, otherwise you risk staining the resin. Plus, a coat of sealant before painting gives the resin more "tooth" (basically, materials stick better).
Q:Do I need to seal the doll after I do its face up?
A:Yes, otherwise your face up will just rub off.
Q:Where should I spray sealant?
A:Out of doors, with respiratory protection! Or else in a well-ventilated area while wearing respiratory protection.
Q:If I spray it out of doors, will the weather affect it?
A:Yes. Try not to spray in humid or wet weather (this will make the sealant do weird things), or in high wind (little particles and stuff will get in). You can spray in the winter, just be sure to warm up the can first or else the sealant will dry oddly on the head.
Q:A tiny particle of dust got in my sealant! How can I remove it without wiping the entire head?
A:Use a sharp exacto knife point and pick it out. Otherwise, you can incorporate it into the face up like a mole or freckles.
Q:If I buy a doll with a face up, do I need to spray it with MSC or other sealant?
A:Usually, no. A doll from the company with a face up will be sealed already. You may want to see the body if you did not pay for body blushing. I personally don't spray the bodies as it just chips off and gets dirty.
Q:How can I prevent body blushing from chipping?
A:Basically, you can't. Wear and play will cause body blushing to chip. Good sealing can help as can I trick I learned on the bjd fb group. For fantasy dolls, use some clear gloss at the joints to help prevent chips and scratches. Plus it just looks kinda cool.
Q:Is acetone safe to use on a doll?
A:Some say yes, others no. Basically, don't soak your doll in it and wash it off as soon as you're done. Use isopropyl alcohol or Winsor and Newton.
Q:What is the difference between MSC and MSC UV cut?
A:MSC UV cut has something in it that can help stave off yellowing. It's also more expensive.
Q:What size of brushes should I buy?
A:You will want a variety of sizes and shapes, and honestly, better quality brushes do make a difference.
Q:Can I do body blushing without an airbrush?
A:Yup, I do it all the time. It takes several shades of the color of pastel, lots of patience, and attention to blending, but it can be done.
Q:What kinds of paints can I use on my doll? Can I use spray paint or nailpolish?
A:In general, no. Unless you know what you're doing you can permanently stain your doll or cause other damage. You want to use acrylic, water based paints.
Q:How can I improve my face up skills?
A:Practice! There's no magic formula.
Q:Any tips for eyebrows?
A:I use a brush to apply pastels, then use a kneaded eraser to shape them. Once that's done, I spray, then add hair lines with a brush or water color pencil.
Q:Any tips for lips?
A:Lip lines are hard, but I use a very shop white or peach colored pencil for lip lines. You can blend them with a q-tip or pastels to make them less obvious.
Q:How should I care for my doll's face up?
A:You can remove dirt and dust with a little water and a cloth. You can use a magic sponge, but I personally am too afraid of removing the face up so I wouldn't do that.Other than that, just try not to touch it. Remove your doll's head instead of forcing clothes over it, and try not to let your doll fall on its face and chip the face up.
Q:How can I remove a face up?
A:Soak the head in Winsor and Newton or isopropyl alcohol. You can scrub with a tooth brush, magic sponge, or other tool to remove the face up. Wash it good when you're done. Some people use acetone or nail polish remove (with no color to it), but you have to be a bit more careful here.
Q:How can I match a head to a body or vice versa?
A:Without an airbrush, resin matching with paint or pastel is a pain in the butt. I've had a hard time without one going over miliput mods. I'd say try to avoid it if you can, otherwise just focus on applying your colors one layer at a time.
More questions? Comment or email!
Materials
Sealant: I always use Mr. Super Clear. I like it. It's toothy, it never goes on too thick, and it doesn't collect dirt the way Testors seems to. However, you can use Testors Dullcoat or the Games Workshop sealant for Warhammer miniatures. I have my local game shop ordering me some other sealant (Army Painter Matte or something similar to that), and I'll post a review when I get a chance to use it.
Respirator: Use a respirator when spraying sealant. If you can smell it, it's gone into your lungs. It can do all kinds of nasty stuff to you over time and prolonged exposure, so cover your mouth and nose. Ask someone at the hardware store which you should buy if you are in doubt.
Watercolor pencils: I use Farber Castell pencils and a couple other brands of artist grade pencils. Try to avoid oil based pencils.
Pastels: I use several different brands. I actually prefer my soft, off-brand ones I got at Wal-mart years ago compared to the more expensive brands I have. To me, the softer chalk pastels blend better, powder better, and go on with prettier pigment for less effort than the harder, fancier ones. Just play around until you find a brand you like. In general, higher quality pastels will have better pigments and require fewer coats.
Gloss: I have some Mr. Color gloss, but I don't like to use it on dolls. It ate through a plastic cup, so I've not been brave enough to put it on a doll. I'm still trying to confirm whether it is in fact safe for dolls. Otherwise, there are some brands of acrylic gloss you can use. I got some at Wal-Mart. It isn't high gloss like a more expensive brand would be, and occasionally takes an extra coat for more shine.
Liner Brush: I use the finest liner brush I could get my hands on for detail work around the eyes.
Pearlescent powders: Basically these are non-oil based fine glitter powders that create a shimmer on your doll's face. You will use the mica powders on many layers in order to build up a nice shine. If you try to add lots of powder on a single layer it will gunk up or lose its sheen.
Random stuff: q-tips, rubber/kneaded eraser, tacky glue for eye lashes, graphite pencil, cup of water, other brushes, pencil sharpener, acrylic paints and acrylic paint thinner, etc.
Warning: Do not use make up or nail polish on your doll. Make up often has oils in it that can damage resin. Nail polish can be impossible or very difficult to remove and can stain resin.
Removing a face up: Scrub with an old toothbrush, some magic sponge, and soak in 90% isopropyl alcohol or Winsor and Newton brush cleaner and restorer.
Steps!
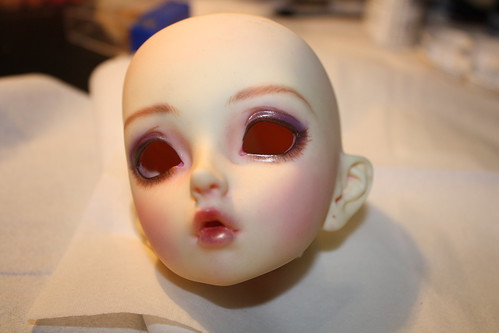
There is nothing more annoying than getting dirt and fingerprints on your doll's pretty face. I've learned this the hard way. Some dust and dirt is unavoidable, but you can prevent a lot of it this way.
Step 2: Spray a coat or two of sealant on the blank head.
You need a coat or two down first in order to prevent staining and to give the pastels something on which to stick. The best quality sealants provide lots of "tooth". Do this while wearing a respirator and preferably out of doors.
Tip: Let each coat of sealant dry very, very thoroughly. If you don't, your face up will get gummy and gross and possibly smear. I like to leave my heads sitting for 10-15 minutes between coats, but you may find you need less or more time than that.
Step 3: Apply base colors
In this step, I add light blushing to the cheeks, lips, and other areas. Don't apply too much color per layer, as this can make the face up look dirty. (Some sealants will get gummy and gross if you do too many layers though, so you'll want to find a balance.)
Spray a coat of sealant.
Step 4: Eyebrows
Shape and draw your eyebrows. Once they are how you want them, add some more color to lips and cheeks, then spray.
From this point you can add more layers of color and blend until you are happy. Repeat this step and spray in between until you get the colors you want.
Step 6: Eyelashes and lip lines
Thin your paint until you get the lines the thickness you want. Using light strokes, paint eyelashes along the lower lids. Spray when you get done with this. Add eye liner if you want, spray. Use colored pencil to touch up lashes (you may want to add more lashes and stuff on top of your layers).
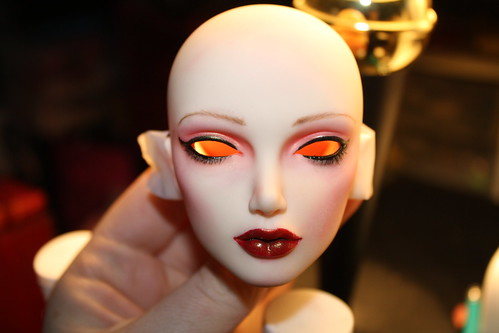
Step 7: Finishing touches
Add any other details you want, spray, then add gloss to lips, the corners of the eyes, and eye liner. After everything is dry you can add your dolls upper eyelashes. I use tacky glue or Elmer's glue to apply them.
 |
| Finished Lorina |
Note on sealant layers: Too many layers of sealant will start to gum up and get cloudy, but too few will make your face up look dirty. You will have to experiment with your particular style and sealant to get the right ratio.
You'll develop your own style as you practice. I've gotten better with each one (you should see my early faceups! scary stuff...), and I'm sure I'll get better as time goes on.
Thank you for reading and happy collecting!
Newer examples of lips done with this method:


I'm looking at face up tutorials in preparation for a mannequin I'm making since I love the style, and I must say you do without doubt the most beautiful lips I've seen. They look so natural and soft.
ReplyDeleteWow! Thanks so much! <3 <3
DeleteHello, I was thinking of (now that I finally have some eyelashes) redoing the faceup on my girl, I've got Crayola coloured pencils and PLENTY of brushes. Only thing missing is MSC (I see that one is used the most compared to whatever other sealants there are out there). Should I even try, or do you NEED to have that stuff?
ReplyDeleteYou want to make sure there are no waxes or oils in the crayola pencils, to avoid staining your doll. If you're using crayola water color pencils you should be fine, but I don't know how the pigments will work on the face up. I've only used the farber castell kind. You don't have to have MSC, as Testors or Army Painter will work fine too, but you must have a sealant. If you don't have a sealant the colors won't stick and the face up will just come off. When I first started out I used Plaid sealant from Walmart. It's cheap, but I wouldn't recommend it. My cheaper sealant recommendation is the Testors, and you can usually find it at walmart for like $5-$7 a can.
ReplyDeleteI hope that helps! I'd say, if you can get a sealant go for it! The only way to figure stuff out is to just dive in and try. As long as there aren't any oils in your stuff, you should be fine. ^_^
Thanks sooooo much for this tutorial and FAQ! I was terrified of doing my own faceup but I'm so much more motivated now, you helped me realize it's not so scary lol :)
ReplyDeleteIt's really fun! It might take awhile to get the hang of it, but don't give up and just use safe materials and you'll be just fine!
Deletewhat do you do for eyelashes on the bottom part on the eye
ReplyDeleteHi, I use thinned down acrylic paint or water color pencils.
Deletewhat do you do to make the bottom eye brows
ReplyDeleteI'm sorry, I may not be understanding your question correctly. I use pastel to create the eyebrow shape and then paint hairs over the top or use water color pencils. I hope this helps!
Deletewhat do you use for the bottom eye lashes
ReplyDeleteHi, I use thinned down acrylic paint or water color pencils.
Deletei heard if you use sealant in humid areas or whatever it will turn cloudy or peel.. now that I know this I'm horribly terrified that i'll mess up. Ive never done a faceup before although I have all the materials. Does clouding and peeling happen easily? i'd love to know, thanks!
ReplyDeleteIn very humid areas, yes, it can have adverse reactions. I am fortunate that I live in a dry climate, so I only have to worry about humidity when it is raining or when the weather is very cold.
DeleteI don't think it happens super easily, and you'll be able to tell by spraying some sealant on the head cap outside whether it is a good time to try. You can also spray indoors if you can leave a window open with a fan to blow the excess overspray out the window or in a well ventilated area. I often use my basement with a fan on when it is not right for spraying sealant outside.
Always wear something to cover your mouth and nose when spraying, especially indoors!
When using watercolor pencils for the face details, does the MSC sealant make the pencil run or blur?
ReplyDeleteHi there, no it should not. If it does do that, it means you applied the sealant way too heavy or didn't let any wet details dry long enough. I usually don't moisten my water color pencils, but if I do I make sure it's reeeeally dry before spraying again. Also, don't spray super close to the face itself or the pressure from the can can cause the pastels to blow off or get splotchy.
DeleteDo you have any tips on vinyl doll heads? I find that if you squeeze the head (when I'm putting the head on the body) the sealant will crack. Not sure if it is because the sealant should not be bent or maybe I did something wrong in the sealing process... I would love to get help with this.
ReplyDeleteUsually sealant doesn't get bent when used, so it's best to avoid it on items that get a lot of squeezing/bending in my experience, but I admit I don' thave a lot of experience with vinyl dolls. When I've painted vinyl dolls, they've already been on their bodies so I've not had the issues of getting them on.
DeleteWhat sealant are you using? You should be able to do at least a few layers with Army Painter without it cracking and bending when you put the head on. Repeated removing the head and putting it back on is likely to damage the sealant, but it should be okay for at least getting the head on right.
If you have a facebook, there is a really helpful group on there for face ups I would def check out.
...Hello, can I ask about the sealants? I´m from czech republic and we don´t have these brands here...so can I use some other brand of clear matte spray? Please excuse my bad english and thank you so much
ReplyDeletePretty much any high quality sealant spray should work. As long as it contains no oils and minimal acetone (I think I read all aerosol sealants contain a little acetone) it should be okay. Is it possible for you to order Liquitex? They make a matte varnish in both aerosol and one that can be applied with an airbrush. I know a lot of European collectors are using this stuff. If you have a question about a specific sealant I can look into it and be more specific!
DeleteHi please help me >_<
ReplyDeleteHow many layer i should spray mr clear before(face up) and after?
and I have to wait to dry each 1 layer before i want spray mr.clear again?
Thanks
Sorry for the delays, I've been very busy. You will want to spray at least two layers before starting to paint. Wait for each layer to dry very thoroughly before spraying each layer.
Delete