Posing pictures can be found here.
Note:
If you are restringing a recast, please be a bit gentle, especially with the thinner areas near the ankles and whatnot.
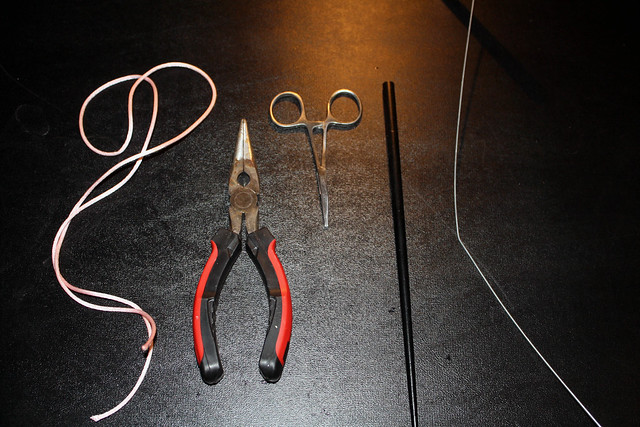
Materials:
Standard restringing tools, like new elastic, calipers, a chopstick or pencil, a ribbon or cord, etc. An extra pair of hands will always make the job easier!

Step 1: Clean Up
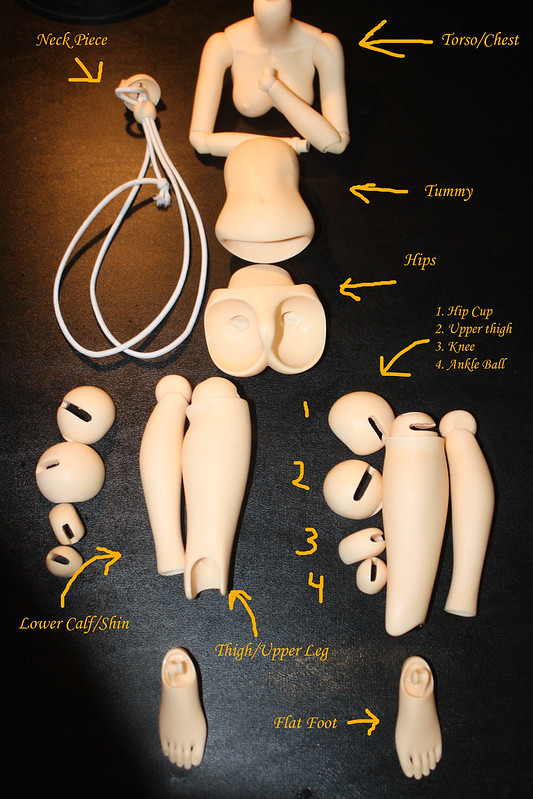
Whenever I'm restringing a doll, especially if it's a recast fresh out of the box, the first thing I do is take the doll apart and make sure the string channels and other areas inside are nice and neat. I bevel, sand, remove flashing, etc while the doll is in pieces. Next, I clean it really good with soap and water. This removes excess oils and resin dust from the doll. Let the doll dry thoroughly before putting it back together.
Note:
Keep track of the pieces and which side of the body they correspond too (left, right, leg, arm, etc).
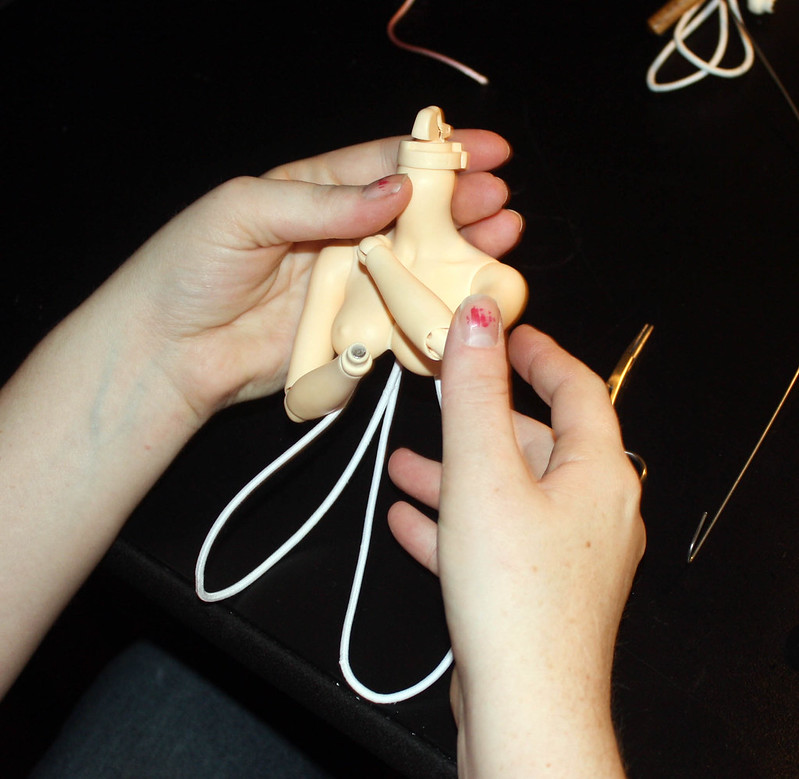
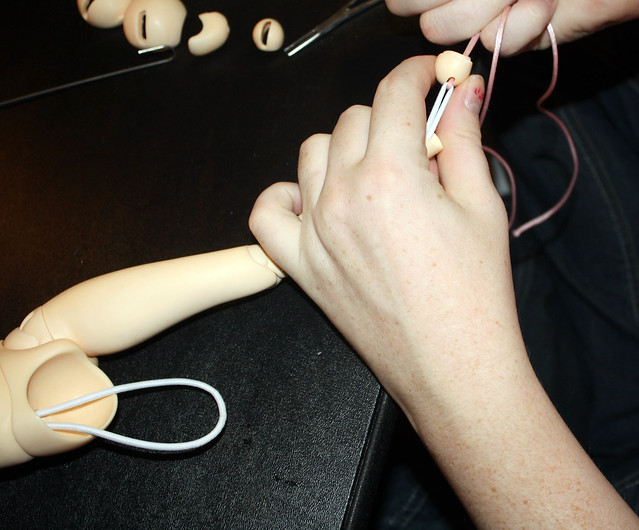
Step 2: The Neck Piece
The neck connector thingy is a pain the rear and can be really confusing. Here is what it is supposed to look like:
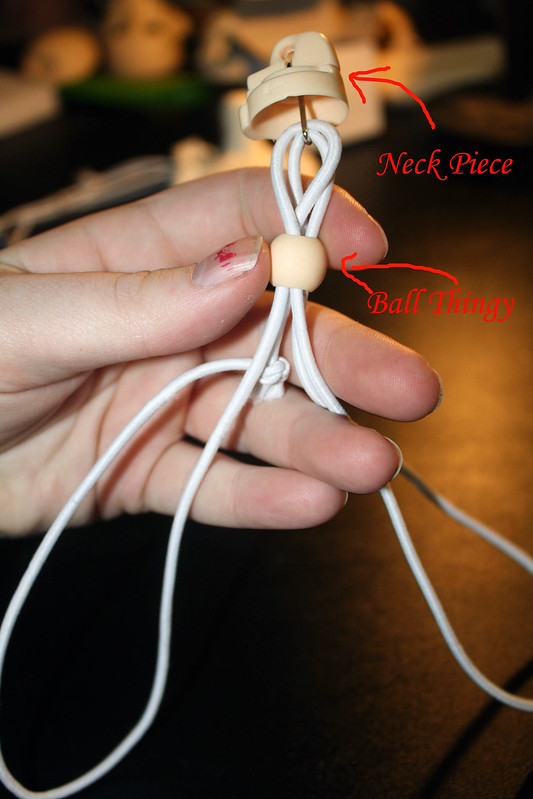
To achieve this, take a long piece of elastic. Tie it in a knot. Fold the string in half and stick it up through that little ball thing. You want the knot close to the ball but not through it, as the neck piece won't fit if the knot sits on top. Hook the little s-hook in the neck piece to the loops of elastic sticking out of the little ball thing. Pull it tight.
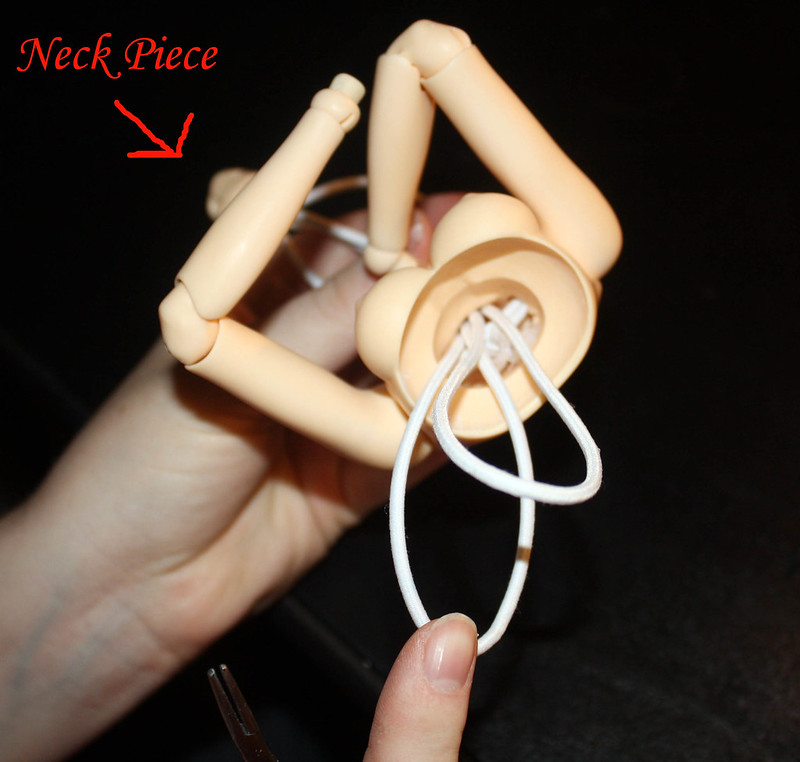
Next, put the elastic loops through the torso piece. This isn't the best image but in general it will look like this:
Step 3: Tummy and Hips
Next, bring the two loops through the tummy piece, like this:
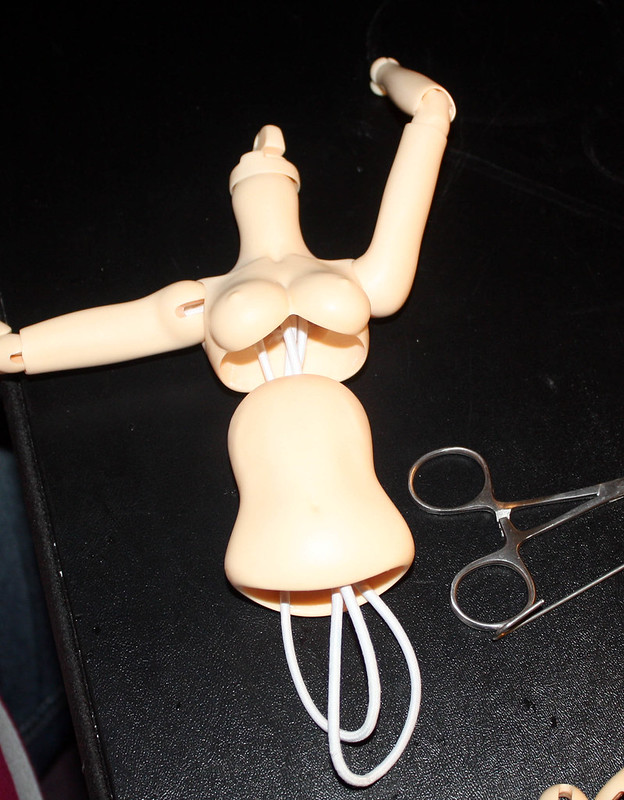
Okay, now the hips. The hips have two openings, one loop goes through each opening. Take a piece of ribbon and put it through one of the elastic loops (you'll need ribbon in the loops for the legs in the next part. I just do it here so I don't forget). Put each leg loop through the hips, as shown:

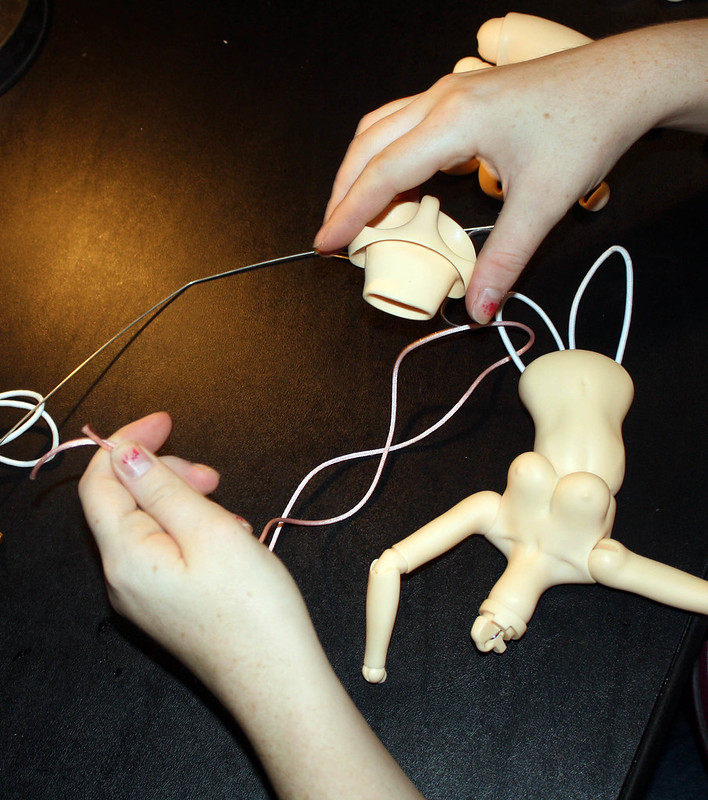
Step 4: The Legs
We forgot to take some good pics of this part, but next you will thread the hip cup onto each loop. The hip cup is the rounded part that fits over the top part of the thigh. In the picture of the pieces all laid out up above it is labeled for you.
Next you will thread the top part of the thigh, followed by the thick upper thigh, knee, and calf. Use ribbon to get the elastic through the narrow calf and to help pull the elastic tight. It will look like this when properly assembled:
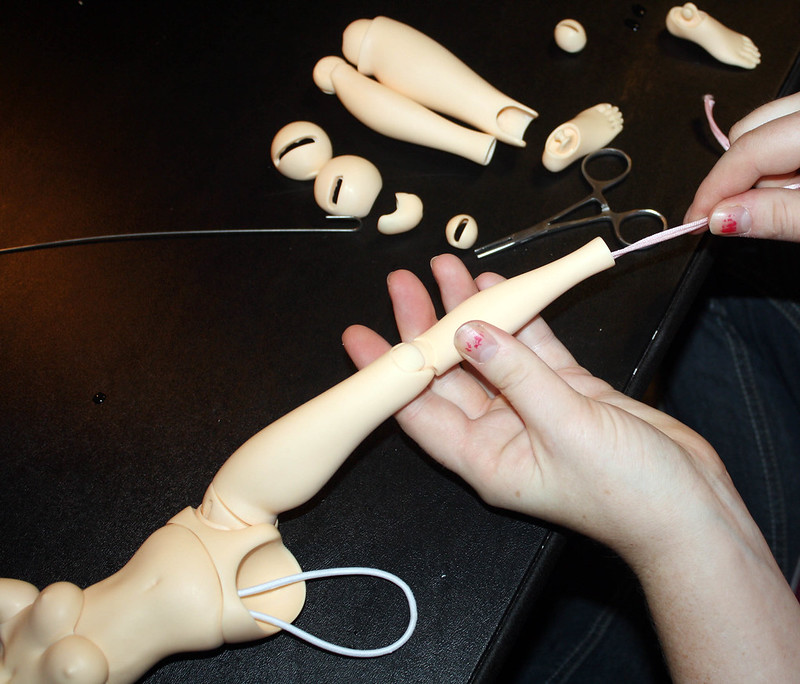
Be sure to keep an eye on which is left leg parts and which is right leg parts! As you go to pull tight on one leg, the loop for the other leg might try to jerk back up into the hip/torso. Use calipers or a chopstick to hold it and prevent it from doing this.
Step 5: Feet!
Next up is the ankle ball. Thread that onto the loop like so:

The feet are a little tricky, especially depending on how tight you're stringing the doll. Minifee feet have these little resin "hooks" in them. You need to place this hook into the loop of string, like so:
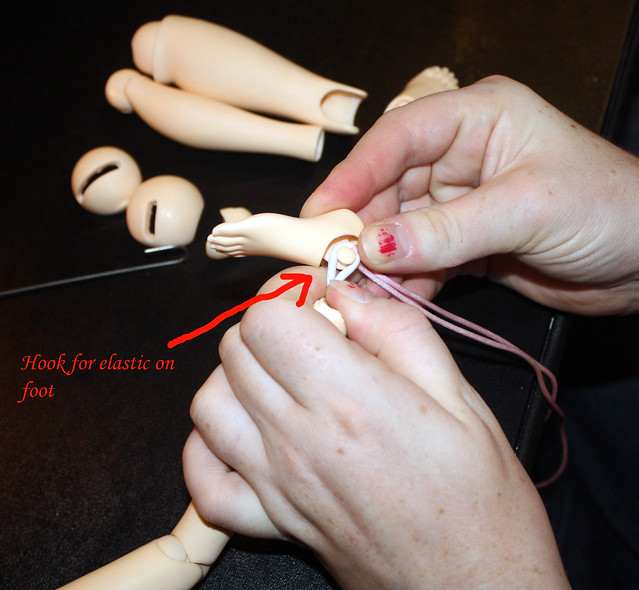
Sometimes it helps to have calipers or a chop stick hold the elastic so that if you miss the hook or it slips off the foot the string doesn't shoot up into the leg. Nothing more annoying than having to restring a leg you've just strung...especially one with as many parts as minifee legs.
Funny note: Right after I made this tutorial I switched from flat feet to heeled feet. Not paying attention, I didn't put a chopstick through the elastic loop under the ankle to prevent the string from shooting up. My hand slipped, and the elastic shot up into the leg and I restring the whole darn thing.
Just repeat this step for the other leg.
Step 6: You're done!
I didn't do an arm tutorial here because I hate restringing arms and the tension was just right as is. You can restring arms essentially the same way as legs, one piece at a time, being careful to attach the wrist balls.
You may have to string and restring a few times until you get your elastic to the right length for tension. Minifee are kind of a pain this way, since there isn't a large s-hook with a knot holding it all together at the head.
In the end I was able to get my minifees to pose extremely well. You can see the pics in the image post I linked to above.
Note: Sueding and wiring helps minifees and most other dolls pose even better. I like to suede while the doll is assembled, some people do not. If you don't like dealing with it while assembled, be sure to suede before putting the doll back together.
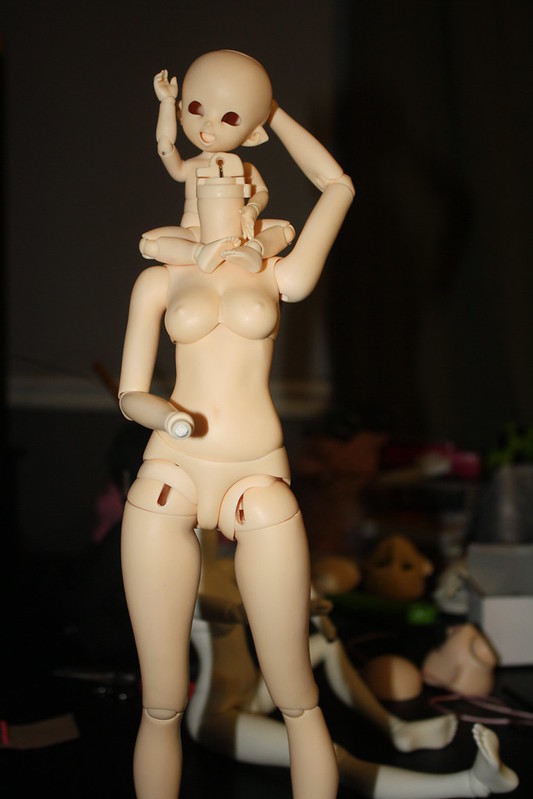
Nifty preview of the pose thread, completely unassisted with a pukifee on her shoulders:
I hope this helps!
If any more pictures or explanations are needed, feel free to comment below. Have a good one, and thanks for looking!
hi there, i also have a "similar" chloe if you know what i mean =) not only is she my first bjd but my first resin one as well, and i'm so confused about how the hip cups are sopposed to be positioned for different types of poses, i once saw a tutorial on you-tube for making minifees sit, and i was wondering if there is a certain position those hip cups are supposed to be in to make the doll stand, my chloe always wants to sit!!! even if shes standing all of a sudden she will bend over at a perfect 90 degree angle! could she be strung too tight/loose? i have no idea, as this is my first resin doll!
ReplyDeleteIt sounds to me like she is strung a little too loose! My white skin minifee body is doing the same thing, but if I fiddle with her hip cups then I can at least get her to stand. The hip cups should be positioned so that they are straight ahead and not twisted or at funny angles. There isn't exactly one magic way they have to be to pose; you kind of just mess with the legs until they straighten. If you'd like, I can try to get a better close up view of my doll's hip cups while she is standing. :)
ReplyDeleteHi there. I am having troubles. I Just got my minifee and she only wants to either sit or kick up her on leg. Is she too tight?
ReplyDeleteYes, that sounds like she might be too tight. You could also try hot glue sueding her to see if that helps. :)
DeleteThanks so much!
DeleteWhat's the best size elastic?
ReplyDelete3.0 mm is what I prefer. :)
DeleteIs there a certain length?
DeleteI haven't measure exactly, but it should be able to length of the body doubled, possibly a little more. The next time I unstring a mnf I'll measure how much elastic I use. I probably won't have time to do it for a couple days though. :(
Deletehave you been able to measure the length of your elastic? Im having problems with my minifees being kicky/loose i cant find a medium
DeleteOh my gosh, no I'd forgotten!!! I'll be restringing my minifee tonight so I'll measure it when I do that. Thanks for reminding me!
DeleteI measured the elastic at about 22-23 inches. ^_^
DeleteHello,
ReplyDeleteI want to add another head on my minifee body, and I have to get rid of the neckpiece. can I get the neckpiece off without reasambling the whole doll??
I would recommend at the very least remove the feet first, so you don't break the resin hooks in the feet while trying to take the neck piece off. Honestly, it's probably safer to unstring the whole doll, but I think you could get away with just removing the feet. Put some ribbon into the elastic so you can easily pull it back out and put the feet back on. Hope that helps!
DeleteI need to replace the elastic in my MNF's legs because no matter how tightly I string her she flops and won't stand. What size elastic would you recommend and where could I find it?
ReplyDeleteI prefer 3.5 or 3mm elastic. Mint on Card carries good elastic, as does Alice's Collections. Coolcat on ebay sometimes has it as well. Good luck hun! <3
Delete