There is a great thread on DoA regarding this, but I ended up making my own miniature books before I found that one. I will update this with some better pictures as soon as I can. There are some rare, amazing miniature D&D books out there, but those can go for $100+ a set, which I just don't have the funds for. *sigh* So, I make do with these.
Showing posts with label DIY. Show all posts
Showing posts with label DIY. Show all posts
Monday, October 13, 2014

Monday, September 15, 2014
When Dye Jobs Go Wrong

Sometimes it happens. For the first time, it happened to me! I have a few theories about why this one went bad:
- My pan may not have been perfectly clean
- There may have been sealant residue or residue from the cleaning product used to remove the face up
- Mold release/odd sanding (as this has kinda happened on my other dragons)
Darker colors seems to be more difficult to dye correctly. I want to test a few more pieces out with darker colors to see what happens. *goes on the hunt for recast spare parts*
I had little to no issue with the pinks and even the dark, dark purple on Grim's parts, so it has to be something more than just the dye itself. In any case, I'm not too worried. The only reason I dyed it as a base was because I didn't want to have to struggle to airbrush the super tiny parts on Penny. It'll be much easier now that they're dyed.
A Summary of the Issues:

- This weird splotchy part on the face
- This cool scale-like pattern on both legs (I'll be incorporating this because it looks cool)
- Weird, brown stain, only on the belly. Wondering if it burnt slightly? Not a clue on this one.
- Uneven coloring, common along seam lines, sanded areas, and areas with mold release.
To fix this dye job, I'm going to be airbrush it!
If you don't have an airbrush, I'd suggest going the My Little Pony customizing route and begin layering thinned acrylic over the top. Use light layers and let them dry thoroughly in order to avoid streaking. Seal it well (one to coats of mod podge and Army Painter), and then blush and add details as normal. You could also attempt to remove the dye with a good soak in a cleaner or scrub it down and try it again.
I'll update after I've finished the airbrushing. Stay tuned!
Monday, August 4, 2014
Acrylic Paint Review
I am not a professional artist, but I've been at this for awhile so I thought I'd share my opinions on some acrylic paints that I've tried. I don't have an airbrush, so I can't address these types of paints.
Games Workshop Paints:
I bought this at my local hobby shop. It comes in a little bitty bottle for a hefty price (I want to say this was like $3-$4, a lot for so small an amount). It doesn't dry quickly, which is a plus for eyelashes, and it has a nice, thick quality to it. It is important to thin it because it is so thick. I find the pigments to be really strong, and I like to use this one for eye liner. I don't use it for super fine lines because it takes a lot of thinner to be useful for that.
I give them a 4/5 for vibrant colors, but it loses a point due to price point.
I give them a 4/5 for vibrant colors, but it loses a point due to price point.
Walmart brand cheap paints (Folkart and others):
These things are great starter paints. They are mostly water, so if you thin them too much they lose their color. They dry very quickly. I use a little retarder to make them last longer. I liked to use these for most applications until I got an upgrade to acrylics with better pigment.
I give them a 2.5/5. Great starter paint, but you will notice the difference when you upgrade.
I give them a 2.5/5. Great starter paint, but you will notice the difference when you upgrade.
Martha Stewart acrylics:
These are surprisingly good. Not too thick, not too thin, so they are good for various applications depending on how much thinner you want to use. These are my default paints, and I like to use them on my pony repaints. They have good color and don't dry too fast.
I give these a 3/5. They are a step above the Folkart paints, but for the price you may as well save up a little bit more and go for an artist grade paint. They are definitely better quality than the folkart paints.
JoAnn Fabrics brand paints:
Not terrible. Slightly better than Walmart brand paints, so you get what you pay for. This brand does make an awesome affordable gloss, which I highly recommend.
2.5/5 for the acrylics, 4/5 for the gloss (it takes a couple coats for maximum effect)
Prismacolor:
These are artist-grade paints. They are perfect. They do require a lot more thinner than the cheaper acrylics because they are thicker, but I really can't complain. The colors are more vibrant even when thinned. They were more than worth the funds. I haven't done a whole lot with them beyond some pony repaints for practice, but I'm looking forward to working with them on a face up.
So far, these babies get a 5/5.
Paints to avoid:
Paints to avoid:
Spray paint- This shit is permanent (mostly, and I assume you can remove it if you really try and/or seal really well before you spray) and can damage resin. I've heard good and bad lately, but it's not a risk I'm willing to take.
Nail polishes- Same as with spray paint. I've heard too many horror stories to even chance this.
Paints with thick glitter in them- They won't look right on the doll, and the glitter will be way out of scale on the tiny area you're working on. They can also clump and look cheap. Avoid.
Paints with thick glitter in them- They won't look right on the doll, and the glitter will be way out of scale on the tiny area you're working on. They can also clump and look cheap. Avoid.
Monday, January 20, 2014
Mini Magic Cards! (File temporarily unavailable for downloading thingy)
NOTE: Having a temporary problem with dropbox making the file unaccessable for a little while. I'll get it uploaded to my flicker in the meantime. Sorry about that guys!!!
Here's my tutorial for making miniature cards, in this case Magic the Gathering cards.
 You could probably do this with any card game, but this is the only one I personally play (besides Call of Cthulhu lol) so that's what I made.
You need:
Here's my tutorial for making miniature cards, in this case Magic the Gathering cards.

You need:
- Scissors
- Paper
- Make sure your printer has colored ink
- Photoshop or the image file from this blog
- Plastic baggy
- Tape, mod podge, and/or glue
Sunday, December 15, 2013
Another bjd dyeing tutorial- this time with LOTS of pictures
[Note blogger was being stupid and I can't seem to get rid of some of the weird linking. T___T]
Minion needed to be pink. I bought two boxes of RIT Petal Pink for this project.
Time needed: 1-3 hours
(Depends on your water to dye ratio, the size of your pot and amount of pieces you're going to fit in there, and how vibrant you want your color.)
Okay, so see this post here for materials and stuff. I tried to take much better pics this time.
Warnings:
Minion needed to be pink. I bought two boxes of RIT Petal Pink for this project.
Time needed: 1-3 hours
(Depends on your water to dye ratio, the size of your pot and amount of pieces you're going to fit in there, and how vibrant you want your color.)
Okay, so see this post here for materials and stuff. I tried to take much better pics this time.
Warnings:
- This is pretty much permanent. I don't recommend this unless you're a fairly seasoned modder or have an easily replaceable doll just in case something goes wrong.
- Someone asked me why their dye turned their doll a bizarre gray color- I don't have an answer for that, but I do think it either had to do with the metal in their pot or that the dye was old.
- Some areas aren't going to take the dye evenly, and some will end up darker and lighter than others. How noticeable this is depends on how saturated your color is. You can usually hide this via blushing, but I think it adds character.
- Wear and tear is going to happen, and the dye, just like paint, will wear away over time. You'll have to do touch ups on occasion if this bothers you.
Sunday, December 1, 2013
Amaranth's Guide to Filter Masks Part 1
I am by no means a professional. I did some research on DoA (there are really great threads with good information there), as well as on the internet. Knowing that many people don't have access to DoA, I thought I'd do a simple hobbyist's guide to filter masks. I tried to keep it really simple and not wordy.
Here is part 1, just some basic Q & A and terms. I'll go into detail about numbers and what they mean in the next post.
Monday, November 11, 2013
Sealant Comparison: For When You Just Can't Get MSC
Army Painter Matte:
- It has very little tooth, so it takes a lot more layers to achieve good color with it.
- It is also prone to snow flaking.
- It is good priced.
- I will update this post as I finish a face up using it. It does hold up really well to handling, which I would assume for a sealant used for miniatures.
Testors: If you have to use something other than MSC,
this is what you want.
- Testor's gets a lot of crap, but it's pretty good. It has good tooth.
- It does tend to appear more yellow, and if you use too many layers it can get cloudy.
- For the price and availability it is a good choice.
- It also seems to get a bit dirtier than MSC.
- I can get Testor's at my local Walmart.
Plaid: Please, please, please do not use this.
- It is gummy, collects dirt, doesn't hold color well, and just looks unfinished.
- It is very, very cheap and available at a lot of places so if you have no choice, go ahead.
- It is safe on resin dolls.
Modge Podge: I have heard conflicting reviews about
this, so here is my experience:
- It is great for joint areas in full body blush, not for face ups.
- It's far too thick to even consider for a faceup.
- It's sturdiness means it's pretty damn difficult to remove, but it does appear to be safe for resin as far as I can tell.
- My centaur's hooves are varnished with this.
- It gives them a bit of a glossy touch and they haven't chipped yet, compared to other areas of her body blush.
Next sealants I want to try:
Volks' sealant
Citadel Matte Sealant
Just my initial thoughts on them. I will provide some
pictures of face ups done with these sealants at a later date.
Thanks for reading and happy collecting!
Thursday, September 26, 2013
Restringing a Pipos Cheshire Cat with poses

My little helper here is Grimalkin. He needed to have his blushing touched up, and I thought a tutorial may be useful. Here goes!
First, you will need a length of elastic about 20in long folded in half and tied in a knot. Your mileage may vary, and you may need shorter elastic to get him tighter.
They are very top heavy, and benefit from sueding the head/neck area.
Thursday, September 12, 2013
Restring a @%%#!!! DC Alberta
You should know I literally cried during this, and once threw a leg across the room. I strongly recommend a glass of wine (for you peeps 21 or older) and a helper. I could find little no information, even on DoA about this process, so I hope this post helps. This is just how I did it, and there's a tiny pair of holes I didn't use and have no idea what the hell they're for. At one point, three times in a row, the ankle hook slipped off the foot and shot up into the shin. Boy was I PO-d… anyway, onto the tutorial! Oh, and this Alberta is recast, so don't link or share this where recasts aren't welcome yadda yadda. If you want this done with a legit Alberta come November, let me know.
You will need:
Wire (my usual restringing cord was too thick)
Possibly a dremel or exacto knife (if you want/need to widen or reshape string channels)
Possibly extra 1/4/MSD elastic (If you are stringing a recast, cutting the string L/S gives you in half should be long enough. I will get better measurements…)
Monday, September 9, 2013
Amaranth's Face Up Rules
These are the rules I personally follow when painting face ups. Just some food for thought, and of course you don't have to do any of these.
- Never paint with acrylics on the same layer as pastels.
Why: If you try to use water to wipe away the acrylic or the acrylic smears, you will ruin the pastel and have to redo it. - When you like something, seal it, then keep painting.
Why: If you like the way something looks, you can always add more. If you end up adding more and hate the result, you'll have to wipe all your work including the part you like. Seal often. - Never touch a face up before sealant or paint is dry.
Why: You'll end up with smudges, smears, and tacky parts and sometimes your sealant will completely come off in spots, ruining your beautiful blushing. I hate when this happens.
My face up was ruined because of this.... - Wash your hands, and often.
Monday, August 26, 2013
Face Up Tips: Lips
As you know, I'm still working on improving my techniques so I thought I'd share what I've learned. Here is my trick for lips.
A little background on this head: She's a recast Volks SD16 Kira. Her original owner tried to blush her to match a yellow skin body, and despite all my scrubbing, I can't completely remove it. [Edit: I have since removed it and redone the faceup.] So, this is making one eyebrow look really goofy. Please ignore that for the sake of the tutorial.
 |
| I'm addicted to shimmer powders. |
1. Block out the face up colors. On the lips, dab some color in the middle on the bottom and on the sides of the upper lips. (For a more solid lip, dab color over the whole thing).

Monday, August 19, 2013
Restringing a Feeple 60
This tutorial is to show you how to string a Feeple 60 the way Fairyland does it. You could probably string them the normal way, but I prefer the FL way. I'm going to rehash some stuff from the F60/SDgr hybrid tutorial post, so if you read that don't be surprised to see some of the same stuff here. On we go!
Ok first of all, this is a pain in the ass. Probably a bigger pain in the ass than restringing a pukifee, no joke. You WILL want help for this, or else you be looking like a dork like I was doing this.
You will need two lengths of elastic for the body, both about 2ft 4 inches.
 |
| Each piece should be around 2 ft 4in. |
This was a surprise. F60s need two lengths of elastic, one for each side of the body. To remove the neckpiece, first remove the feet.
Friday, August 9, 2013
Face Up Tips: Eyebrows
I'm still learning and improving my face up techniques. I'm not the best or anything, but I have figured out some things that help me with my face ups.
 |
| I <3 shimmer powders!!! |
Here's my technique for eyebrows. Update: Scroll to the bottom of the post to see recent eyebrows done with this method!
Tuesday, July 23, 2013
On Doll Eyes and Eye Positioning
Hi there everyone! It's been a little while, so I thought I'd post up a tutorial on how to position eyes. I, quite frankly, am terrible at it, so I set off to learn what I could about positioning eyes. Follow along with my adventure!
I wanted to avoid this….

Which looks suspiciously like this….
 |
And if that's what you're going for, great! (I think.) If not, read on!
Friday, July 5, 2013
Face Up Removal: Windsor and Newton vs Isopropyl Alcohol vs Nail Polish Remover
I've removed a lot of face ups in my short time in the hobby (I've been around for about 4 years). I've used nail polish remover, Winsor and Newton (referred to for the rest of the post as W&N), and various strengths of rubbing alcohol to remove face ups.
I have a few dolls I've been meaning to redo, and I thought while I was at it I might as well take some pictures and do a few comparison/tutorial posts. The next post will be my face up tutorial. I may film it, but I haven't decided yet.
I've decided to do a comparison/how-to feature for these so you can decide which is best for you.
I'm not getting into the acetone/no-acetone debate thing though. I don't know enough about acetone to say either way. I've heard horror stores, but then I've used products with acetone and had no issues myself. So, it's best for me just to avoid that subject for now.
Sunday, June 16, 2013


Tuesday, June 4, 2013
A Mostly-Text BJD Repair Tutorial
Sometimes dolls get cracked or broken. This sucks. Sometimes you can order replacement parts from the company, but other times you can't (you bought it second hand, too expensive, it's a recast, it's sold out, etc). You CAN fix your doll and make it good as new.
What you need:
Milliput or other Epoxy, Super glue, or epoxy glue
Tools to spread the milliput
fine sandpaper
Epoxy is amazing stuff. You can make pretty much anything out of it, you can sculpt it, modify it once it's dry, and paint over it.
Step 1:
Wash your hands, your work area, and your doll thoroughly. There is little worse than getting little bits of lint stuck in your epoxy after it's dried. Epoxy also best adheres to a clean, dry surface.
Monday, May 13, 2013
Face Up FAQ and Tutorial
This post is to highlight some of my face-up techniques. I'm by no means the best, and there are lots of face-up tutorials out there, but hopefully you will get some use out of this tutorial. :) I will try to update this post as I come across more face up questions. First, the FAQ, then the materials list, followed by the tutorial.
Note: I don't update this as I improve my faceups because that's a pain in the butt, so if you want to see my latest stuff you can always check my flickr.
https://www.flickr.com/photos/amaranthscastaways/
Face Up FAQ
Q:What materials do I need?
A:See below!
Saturday, May 11, 2013
Miniature Book of Shadows Tutorial
You'll need:
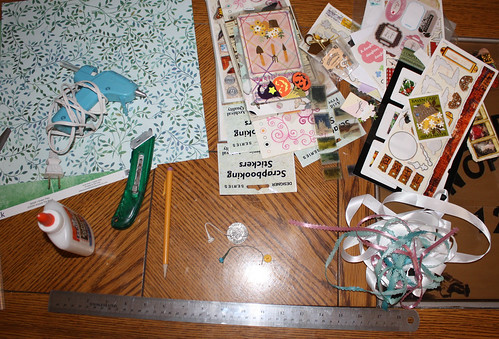
- Cardboard (thickness is up to you, but I like to use corrugated cardboard)
- Glue (Elmer's white glue or glue stick, hot glue or super glue or other strong glue)
- Dark tea bag, steeped (but don't burn yourself!)
- Match or lighter
- Water
- Decorative objects (flowers, scrapbooking materials, stickers, etc)
- Printed pictures
- Ribbons
- Decorative paper and/or fabric
- Stapler or thread and needle
- Scissors
- Ruler
- Pencil
Subscribe to:
Posts (Atom)