NOTE:

I do not make, sell, or traffic in bootleg/recast dolls or any other product.

I do not provide information on where or how to buy them.

Any recast information on this blog is for information purposes only, for identifying recast products on the second hand market.


Showing posts with label Ashes. Show all posts

Monday, March 23, 2015

Identifying a Recast: Aileen Doll

Legit Violet
As many of my readers know, I mostly own recast Aileen Doll dragons. I recently purchased my first legit dragon, and thought I would share some things that I found.

Company: Aileen Doll

Website: http://aileendoll.com/

Sculpts Available Recast: Ashes, Rot, Sleeping/Dreaming Ashes, egg


Stringing: Recast AD generally have their legs strung backwards (unless the current owner has switched them).

Backwards legs.

Saturday, February 15, 2014

On Steampunk and Hamilton, my Steampowered Pseudodragon


So far my little Lord Hamilton (Gizmo, as Mr. Amaranth calls him) is coming along quite nicely. I wasn't sure I could pull this mod off, but he's really looking great so far. I'm really proud of myself.

Note: There are watermarks on the images because if people are going to use them/steal them, I want those who view them to know where they can come to get real, accurate info regarding the stuff in the pictures. 
 
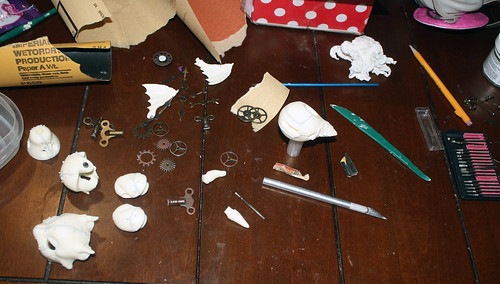
workspace
Working on my dining room/project table that we never actually dine on. This is my mess.
I am not proud of this mess. XD

List of stuff still to do:

*Dye him a base color
*blush and seal
*paint additional details
*Complete clock-wings
*Finish the goggle/monocle
*Make the top hat
*Order a dragon eye for the right eye
*Is that actually all that's left to do?!! @___@

Stuff that's finished:

Friday, February 14, 2014

Steampunk Dragon Mod Project- Hamilton, a WIP

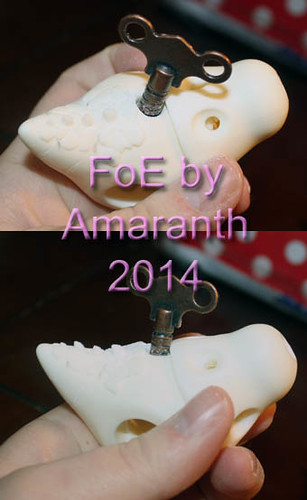
I've been working on a steampunk dragon mod using the Aileen Doll Ashes recast I received from S/L last month.So far, I've drilled the guidelines for what will eventually become his epoxy weld lines with bolts and such and opened his eyes. One eye was damaged after the lid shattered, due to a weak cast. I'll be covering it with a monocle when I find the right parts.

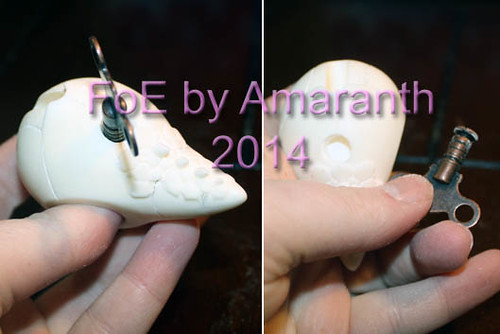
I drilled out the hole for the clockwork, windup key thingy tonight. I need to make it just a touch wider so that I can line the hole with epoxy and prevent the key from digging into the resin. It can be removed, and it can turn a full 360 degrees. I'm pretty pleased with it so far.

Once I get all weld lines and epoxy additives done, I'll dye the doll a coppery color. Then, I'll blush him and paint him. When that's all done all add the rest of his gears and such and other epoxy add-ons.

(I apologize for the large water marks on the photos, but I'd like people to know where they can find this info, and with one blog already using my stuff without crediting me, I kinda have to do this. Sorry.)


steam dragon 1


steam dragon 2

Monday, December 23, 2013

Restringing Aileen Doll Ashes

Here is a tutorial for restringing an Aileen Doll Ashes. This guy is a recast, just to let you know so you don't share this where it's not welcome.

As usual, my disclaimer: Don't ask me where or how to buy. I don't distribute.

To start, I should note that I didn't do this right…when the tutorial says to put the wings on first, DON'T. Instead, do the arms first then the wings. My dragon's wing snapped because I put it on first.

Second note: You will use one piece of elastic to string both arms and the wings. I tried to take clear pictures of this, so if you need more explanation go ahead and comment here.

I haven't been checking emails due to anxiety (I hate dealing with email), so if you have emailed me, I'll get to it eventually, I promise!

Sunday, December 15, 2013

Another bjd dyeing tutorial- this time with LOTS of pictures

[Note blogger was being stupid and I can't seem to get rid of some of the weird linking. T___T]

Minion needed to be pink. I bought two boxes of RIT Petal Pink for this project.

Time needed: 1-3 hours
(Depends on your water to dye ratio, the size of your pot and amount of pieces you're going to fit in there, and how vibrant you want your color.)

Okay, so see this post here for materials and stuff. I tried to take much better pics this time.

Warnings:

  • This is pretty much permanent. I don't recommend this unless you're a fairly seasoned modder or have an easily replaceable doll just in case something goes wrong.
  • Someone asked me why their dye turned their doll a bizarre gray color- I don't have an answer for that, but I do think it either had to do with the metal in their pot or that the dye was old.
  • Some areas aren't going to take the dye evenly, and some will end up darker and lighter than others. How noticeable this is depends on how saturated your color is. You can usually hide this via blushing, but I think it adds character.
  • Wear and tear is going to happen, and the dye, just like paint, will wear away over time. You'll have to do touch ups on occasion if this bothers you.